:::: MENU ::::

Magento Tutorial | Magento Blog | Learn Magento 2

Are you a Magento 2 Developer? then you are at right place.

Cookies Consent Popup

If you are planning to add Recently Viewed products to your website then always use default magento approach. below approach is deprecated.


Because its not fully compatible with FPC so,now days magento using knockoutJS for Recently Viewed products. If you need to add a 'Recently Viewed' products block specifically via layout xml, use the same class Magento\Catalog\Block\Widget\RecentlyViewed which the 'Recently Viewed' Product widget uses.


This will render a simple grid with the last 4 products view by the user.
You can configure the block further, just as you would the widget instance:


One thing to note is that the argument values for ```show_attributes``` and ```show_buttons``` need to be declared as comma delimited strings (no spaces).
Declaring them as arrays or including spaces next to your comma's won't work due to the way the UI Component parse the content before Knockout renders it.
And since I said Knockout... it should play nicely with FPC, should.
Finally this solution doesn't use the **'action'** instruction which appears to have been deprecated.

That's it. Happy Coding !!!

First, You must have installed the Mailchimp extension in your project.


To Synchronize Mailchimp with Magento facilitate the subscription to the Newsletter for the customer and get the service of Mailchimp that will provide a lot of other additional services to the Magento platform.


How to configure Mailchimp in Magento 2?

1) Mailchimp -> Configuration,


2) From the Mailchimp General Configuration Section,
Choose Yes from the Enabled Field. You can see the above screenshot for reference to the enabled option.


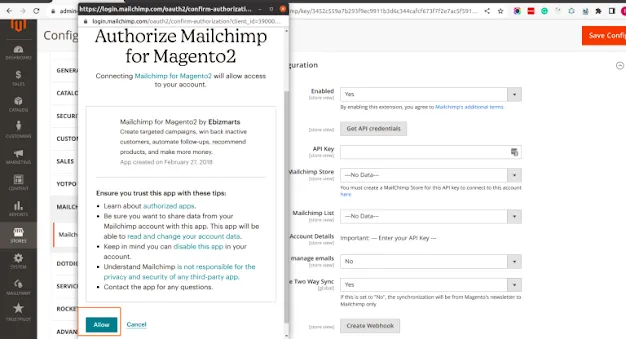
3) Click on the Get API Credentials, and a new popup opens from Mailchimp,

When you click on the Get API Credentials button, a new popup will be displayed for asking the username and password for the MailChimp.
After Login with a Mailchimp account, the Second step you will ask to allow for Authorize Mailchimp for Magento 2, Press Allow button to go to the next step in the Popup.
Once you press Allow button, you will see the API key for Mailchimp that need to be added to the API key field of Magento.


You can see the final step of Popup from the Mailchimp API key as looks like the given screenshot.


4) After inserting the API key to the configuration, you need to click the top right button Save Config to save our changes.

This is the process to connect a Mailchimp account with Magento. you can use the subscription feature of Mailchimp in Magento by following the above steps.


 After upgrading to 2.4.3-p1 this issue occurs

Actually it was a problem with upgrade from 2.3.6 to 2.4.3 - magento added 2FA to login in 2.4 and on my Windows installation, for some reason, instead of showing error informing me that i need to configure 2FA to login, it just reloaded login form without any notice or errors.

Disabling 2FA module will solve the issue.


please run below command in terminal Magento root path :


    bin/magento module:disable Magento_TwoFactorAuth

    bin/magento cache:flush 

basically shim is used to avoid dependency conflict. 

For example if you calling a **custom javascript** then it must be loaded after javascript library isn't it? but magento doesn't know whether the library is loaded or not. So using shim we'll let system know that it is dependent on **library** so it will be instantiated when we map shim.

And

Magento uses requirejs to speed up the stuffs and (asynchronously module dependencies) nature of require js. So we use shim to tell the machine load our defined dependency first i.e., **jquery**

If we don't define then we get **jquery not defined error** while developing custom extensions as well.

The RequireJS shim configuration directive allows you to configure what I’ll call “load order” dependencies. i.e., you can say

when you load the jquery.cookie module? Make sure you’ve completely loaded the jquery module first. 


**Example :**

    var config = {

    paths:{

        "jquery.cookie":"Package_Module/path/to/jquery.cookie.min"

    },

    shim:{

        'jquery.cookie':{

            'deps':['jquery']

        }

    }};


We’ve defined a new top level configuration property named shim. This property is a javascript object of key value pairs. The key should be the name of your module (jquery.cookie above). The value is another javascript object that defines the shim configuration for this specific module.


That error indicates somewhere in your code passing null to the third parameter when calling a PHP function that is deprecated in PHP 8.1.


Assume you have below code:


return sprintf(
    $path,
    str_replace('methods_', '', $method)
);

The type of the third parameter should be changed to string if it is null. So the fixed code looks like the below:


return sprintf(
    $path,
    str_replace('methods_', '', $method ?? '')
);

The solution for your code:


$fromDate = date("Y-m-d",strtotime(str_replace("/", "-", $helper->getNewYearBallFromDate() ?? '')));
$toDate  = date("Y-m-d",strtotime(str_replace("/", "-", $helper->getNewYearBallToDate() ?? '')));

First you need to create your cron file in `Cron` directory as below


app/code/Vendor/Module/Cron/Mycron.php

    <?php

       namespace Vendor\Module\Cron;

       class Mycron

        {

          protected $logger;

          public function __construct(

        \Psr\Log\LoggerInterface $loggerInterface

          ) {

        $this->logger = $loggerInterface;

          }

          public function execute() {

            //Your Logic/Code here

            //$this->logger->debug('Vendor\Module\Cron\Mycron');

          }

        }


then create cron_groups.xml in `app/code/Vendor/Module/etc/cron_groups.xml.

 it's option step.


    <?xml version="1.0"?>

    <config xmlns:xsi="http://www.w3.org/2001/XMLSchema-instance" xsi:noNamespaceSchemaLocation="urn:magento:module:Magento_Cron:etc/cron_groups.xsd">

        <group id="vendor_module_cron_group">

            <schedule_generate_every>1</schedule_generate_every>

            <schedule_ahead_for>4</schedule_ahead_for>

            <schedule_lifetime>2</schedule_lifetime>

            <history_cleanup_every>10</history_cleanup_every>

            <history_success_lifetime>60</history_success_lifetime>

            <history_failure_lifetime>600</history_failure_lifetime>

            <use_separate_process>1</use_separate_process>

        </group>

    </config>


This will add entry in admin 

Now for scheduling cron script create crontab.xml on below path

`app/code/Vendor/Module/etc/crontab.xml`. 

Schedule time according to your need. I configured for every 5 minute.


    <?xml version="1.0"?>

    <config xmlns:xsi="http://www.w3.org/2001/XMLSchema-instance" xsi:noNamespaceSchemaLocation="urn:magento:module:Magento_Cron:etc/crontab.xsd">

        <group id="vendor_module_cron_group">

            <job name="vendor_module_cronjob_mycron" instance="Vendor\Module\Cron\Mycron" method="execute">

                <schedule>*/5 * * * *</schedule>

            </job>

        </group>

    </config>


This will execute your cron at every 5th min. your magento cron must be configured on your server or you can run manually by running `php bin/magento cron:run` (run twice for schedule and execute)


Note: you can skip cron_groups.xml step and define default group too as below 

<group id="default">


"catalog_product_save_before" This event gets called for every product save action, including new products.

In order to use it you could do the following in your module:

**app\code\Vendor\Module\etc\webapi_rest\events.xml**


    <?xml version="1.0"?>

    <config xmlns:xsi="http://www.w3.org/2001/XMLSchema-instance" xsi:noNamespaceSchemaLocation="urn:magento:framework:Event/etc/events.xsd">

        <event name="catalog_product_save_before">

            <observer name="catalog_product_save_before_check_condition" instance="Vendor\Module\Observer\Productsaveafter" />

        </event>

    </config>


Then in `Productsaveafter.php` you can implement logic to connect to your own software and perform actions like adding or updating the product. 


Example:


**app\code\Vendor\Module\Observer\Productsaveafter.php**


    <?php

      namespace Vendor\Module\Observer;

     class Productsaveafter implements ObserverInterface{    

         public function execute(\Magento\Framework\Event\Observer $observer) {

           $product = $observer->getProduct();

            // Your logic to do stuff with $product       

            }

    }


Happy Coading ... Cheers !!!!!


Exception #0 (Zend_Db_Statement_Exception): SQLSTATE[42S02]: Base table or view not found: 1147 Table 'inventory_stock_1' doesn't exist, query was: INSERT INTO `search_tmp_6gsdfd66g1_11236565` SELECT `main_select`.`entity_id`, SUM(score) AS `relevance` FROM (SELECT DISTINCT `search_index`.`entity_id`, (((0) + (0)) * 1) AS `score` FROM `catalog_product_index_eav` AS `search_index` INNER JOIN `catalog_product_entity` AS `product` ON product.entity_id = search_index.entity_id INNER JOIN `inventory_stock_1` AS `stock_index` ON stock_index.sku = product.sku INNER JOIN `catalog_category_product_index_store1` AS `category_ids_index` ON search_index.entity_id = category_ids_index.product_id AND category_ids_index.store_id = '1' WHERE (search_index.store_id = '1') AND (`search_index`.`attribute_id` = 102 AND `search_index`.`value` in ('2', '4') AND `search_index`.`store_id` = '1') AND (category_ids_index.category_id = 225)) AS `main_select` GROUP BY `entity_id` ORDER BY `relevance` DESC, `entity_id` DESC LIMIT 10000 Exception #1 (PDOException): SQLSTATE[42S02]: Base table or view not found: 1146 Table 'inventory_stock_1' doesn't exist

Solution:

Please follow these steps:

1) Open your webiste database.

2) Remove your current "inventory_stock_1" view and run below mysql query:

CREATE
SQL SECURITY INVOKER
VIEW `inventory_stock_1`
  AS
    SELECT
    DISTINCT    
      legacy_stock_status.product_id,
      legacy_stock_status.website_id,
      legacy_stock_status.stock_id,
      legacy_stock_status.qty quantity,
      legacy_stock_status.stock_status is_salable,
      product.sku
    FROM `cataloginventory_stock_status` `legacy_stock_status`
      INNER JOIN `catalog_product_entity` product
        ON legacy_stock_status.product_id = product.entity_id;

 Reindex your store data then check your store.

This article is about Magento 2 – Update product attribute value . Updating product attribute value can be tricky sometimes. In this tutorial i will try to explain it swiftly and in a simple way. There can be various conditions in this matter. Like if someone wants to update the attribute values one by one or as a whole. Here, we are looking t update only one attribute value.

We can set all the values into one object (also we can use set for each attribute) & using set method we can save the product attribute with the help of productRepository or product model.

Furthermore When we use this method, there is a chance to get delays while updating the values like it may take 40 to 50 sec approx for one product . In our case we want to update only one attribute value. To render entire collection & updating the value might will take some ms delay.
So to update only one attribute value, we can do so by using the following code.

Consider the example here.

$item->setWidth(10);

$item->save();

We can use “updateAttributes” method to update Specific Attribute for product instead of updating all the update.

Here we have to pass 3 parameters.


Ex: $productIds , $attrData, $storeId
$objectManager->get(‘Magento\Catalog\Model\Product\Action’)

->updateAttributes( [$item],[‘width’ => 10],  $YourStoreID );

Similarly

$this->action->updateAttributes([$productObj->getId()], [‘Yourattribute_code’ => ‘Yourvalue’], $StoreId);

I am also providing the path for reference, it may vary depending upon your settings.

Magento\Catalog\Model\Product\Action

That’s it from this tutorial. I strongly believe there is always room for improvement.So i am open for any suggestion and feed back. Please feel free to leave hat you are thinking in the comments section below. Cheers.


Magento 2 versions from 2.3 have a replacement for traditional install/upgrade schema which is used to maintain the database structure.

From Magento 2 version 2.3, they have introduced the declarative schema file for database (etc/db_schema.xml) which is used to maintain the database structure for a module.

Now you can forget about untidy install/upgrade file and see the latest database structure version of a module in a single file.

For Magento 2 to identify the database schema changes, you need to maintain a file db_schema_whitelist.json against which Magento will compare your database structure from db_schema.xml and decide to update the database structure of your module while executing bin/magento setup:upgrade command.

In order to create the db_schema_whitelist.json in your Magento 2 module, you can run the below command:

  1. php bin/magento setup:db-declaration:generate-whitelist [options]

Where [options] will be,
–module-name[=Modulename] specifies the Module name to generate a whitelist.

Official Magento 2 documentation:

 If there is a repository and it does what you need well, always prefer the repository.


Repositories are part of the *Service Contracts* (they are implementations of interfaces in `Api`), this means they are meant as a public interface to other modules.


# Use Repositories for full loading


`$model->load()` is not part of the service contract. I had a question on that particular topic, you might find the answers useful: https://magento.stackexchange.com/questions/111286/is-there-ever-a-reason-to-prefer-model-load-over-service-contracts


# Use Factories to create new entities


Repositories do not come with methods to create a new entity, so in that case, you will need a factory. But use the factory for the *interface*, such as `Magento\Catalog\Api\Data\ProductInterfaceFactory` - it will create the right implementation based on DI configuration.


Then use the `repository->save()` method to save it.


# Use Collection Factories if you need more control


The following is not official Magento best practice, but currently, repositories do not give you fine control over what to load. The search criteria API lets you define filters, but for example, there is no way to select particular EAV attributes or specify which index tables to join. 


These are implementation details, hidden from the service contract APIs, but often these implementation details matter and you get poor performance if you ignore them. For that reason, as soon as the repositories are limiting me I don't hesitate anymore to use the underlying collections.

Try this code.

**system.xml**

    <field id="list_mode" translate="label" type="select" sortOrder="1" showInDefault="1" showInWebsite="1" showInStore="1">

       <label>List Mode</label>        

       <source_model>Vendor\Module\Model\Config\Source\ListMode</source_model>

    </field>


**Vendor\Module\Model\Config\Source\ListMode.php**

  namespace Vendor\Module\Model\Config\Source;

    class ListMode implements \Magento\Framework\Data\OptionSourceInterface

    {

     public function toOptionArray()

     {

      return [

        ['value' => 'grid', 'label' => __('Grid Only')],

        ['value' => 'list', 'label' => __('List Only')],

        ['value' => 'grid-list', 'label' => __('Grid (default) / List')],

        ['value' => 'list-grid', 'label' => __('List (default) / Grid')]

      ];

     }

    }

            Try below code: 

           $obj = \Magento\Framework\App\ObjectManager::getInstance();    

            /** @var \Magento\Catalog\Model\Product $product */

            $productObject = $obj->get('Magento\Catalog\Model\Product');    

            $product = $productObject->loadByAttribute('sku', 'Test Test');    

            $linkDataAll = [];

            $skuLinks = "0012365,test1233,789456";

            $skuLinks = explode(",",$skuLinks);    

            foreach($skuLinks as $skuLink) {

                //check first that the product exist

                $linkedProduct = $productObject->loadByAttribute("sku",$skuLink);

                if($linkedProduct) {

                    /** @var  \Magento\Catalog\Api\Data\ProductLinkInterface $productLinks */

                    $productLinks = $obj->create('Magento\Catalog\Api\Data\ProductLinkInterface');

                    $linkData = $productLinks //Magento\Catalog\Api\Data\ProductLinkInterface

                        ->setSku($product->getSku())

                        ->setLinkedProductSku($skuLink)

                        ->setLinkType("related");

                    $linkDataAll[] = $linkData;

                }

            }

            if($linkDataAll) {

                print(count($linkDataAll)); //gives 3

                $product->setProductLinks($linkDataAll);

            }

            $product->save();

dont use **objectmanager** this code just for reference


You can use \Magento\InventoryApi\Api\SourceItemRepositoryInterface class with \Magento\Framework\Api\SearchCriteriaBuilder to get source item data by source code and product SKU.

Here are the sample model class


    <?php

    namespace MageExpert\Testing\Model;

    class SourceItemModel

    {


        private $searchCriteriaBuilder;

        private $sourceItemRepository;

        public function __construct(

            ...

            \Magento\Framework\Api\SearchCriteriaBuilder $searchCriteriaBuilder,

            \Magento\InventoryApi\Api\SourceItemRepositoryInterface $sourceItemRepository

            ...

        ) {

            $this->searchCriteriaBuilder = $searchCriteriaBuilder;

            $this->sourceRepository = $sourceRepository;

        }

        public function getSourcesItems($souceCode, $sku)

        {

             $searchCriteria = $this->searchCriteriaBuilder

                ->addFilter('source_code', $souceCode)

                ->addFilter('sku', $sku)

                ->create();

            $sourceItemData = $this->sourceItemRepository->getList($searchCriteria);

            return $sourceItemData->getItems();

        }

    }


Now you can use getSourcesItems() function to get all source items by sources code


    $sourceCode = 'your_store_code';

    $sku = 'Product_1'

    $sourceItems = $this->getSourcesItems($sourceCode);

    foreach ($sourceItems as $sourceItem) {

        print_r($sourceItem->getData());

    }


OUTPUT:


    Array

    (

        [source_item_id] => 96

        [source_code] => your_store_code

        [sku] => Product_1

        [quantity] => 100.0000

        [status] => 1

    )


If error in indexing after upgrade then run below sql query in phpmyadmin


CREATE  SQL SECURITY INVOKER   VIEW `inventory_stock_1`   AS  SELECT  DISTINCT    legacy_stock_status.product_id,   legacy_stock_status.website_id,   legacy_stock_status.stock_id,    legacy_stock_status.qty quantity,   legacy_stock_status.stock_status is_salable,   product.sku    FROM cataloginventory_stock_status` `legacy_stock_status`  INNER JOIN `catalog_product_entity` product    ON legacy_stock_status.product_id = product.entity_id;


and run below commands

* Clear `var/generation`

* Clear `var/cache`

* Enable Magento modules: `php bin/magento module:enable --all`

* Compile DI `php bin/magento setup:di:compile`

I have installed Elasticsearch in my Linux. 


Follow below Steps.


Run the below command to Install Elasticsearch In locally. 


Download and install the public signing key :


`wget -qO - https://artifacts.elastic.co/GPG-KEY-elasticsearch | sudo apt-key add -`


Installing from the APT repositoryedit 


You may need to install the apt-transport-https package on Debian before proceeding :

`sudo apt-get install apt-transport-https`


Save the repository definition to /etc/apt/sources.list.d/elastic-7.x.list :

`echo "deb https://artifacts.elastic.co/packages/7.x/apt stable main" | sudo tee /etc/apt/sources.list.d/elastic-7.x.list`


You can install the Elasticsearch Debian package with :

`sudo apt-get update && sudo apt-get install elasticsearch`


Elasticsearch is not started automatically after installation. How to start and stop Elasticsearch depends on whether your system uses SysV `init` or `systemd` (used by newer distributions).


`ps -p 1`

Running Elasticsearch with SysV `init` : Use the `update-rc.d` command to configure Elasticsearch to start automatically when the system boots up : 


`sudo update-rc.d elasticsearch defaults 95 10`


Elasticsearch can be started and stopped using the `service` command :


`sudo -i service elasticsearch start`

`sudo -i service elasticsearch stop`


Configure Apache and Elasticsearch : Set up a proxy (Set up a proxy for Apache 2.4)


Enable mod_proxy as follows :

`a2enmod proxy_http` or `sudo a2enmod proxy_http`


Use a text editor to open /etc/apache2/sites-available/000-default.conf


Add the following directive at the top of the file :

`Listen 8080`


Add the following at the bottom of the file :

    <VirtualHost *:8080>

        ProxyPass "/" "http://localhost:9200/"

        ProxyPassReverse "/" "http://localhost:9200/"

    </VirtualHost>


Restart Apache :

`service apache2 restart` or `sudo service apache2 restart`


Verify the proxy works by entering the following command :


For example, if your proxy uses port 8080:

`curl -i http://localhost:8080/_cluster/health`


If curl request success then messages display like below : 

    HTTP/1.1 200 OK

    Date: Sun, 23 Aug 2020 06:05:56 GMT

    Server: Apache/2.4.18 (Ubuntu)

    content-type: application/json; charset=UTF-8

    content-length: 389

        {"cluster_name":"elasticsearch","status":"yellow","timed_out":false,"number_of_nodes":1,"number_of_data_nodes":1,"active_primary_shards":1,"active_shards":1,"relocating_shards":0,"initializing_shards":0,"unassigned_shards":1,"delayed_unassigned_shards":0,"number_of_pending_tasks":0,"number_of_in_flight_fetch":0,"task_max_waiting_in_queue_millis":0,"active_shards_percent_as_number":50.0}


Go to `Admin Panel -> Stores -> Settings -> Configuration -> Catalog -> Catalog Search`. Change the settings like below. 


`Search Engine : Search Engine7`

`Elasticsearch Server Hostname : localhost`

`Elasticsearch Server Port : 8080`

`Elasticsearch Index Prefix : magento2`

`Enable Elasticsearch HTTP Auth : No`

`Elasticsearch Server Timeout : 15`

Now save the configuration & run below cache clean command. 

`php bin/magento cache:clean`

Now click on `Test Connection` button.

After successful you will receive `Successful! Test again?` in `Test Connection` button. 

Ref : <a href="https://devdocs.magento.com/guides/v2.4/install-gde/prereq/es-config-apache.html">Dev Docs</a> & <a href="https://www.elastic.co/guide/en/elasticsearch/reference/current/deb.html">Elasticsearch</a>